
If you are new to Audacity’s sound editing software, here are some basic things you need to know.
Video: Audacity Basics for Journalists (MBG) Start video at 2:04 (NOTE: This was made with an earlier version of Audacity. The concepts are the same, but a few specifics have changed.)
1. Install Audacity on your personal computer
- Go to http://audacity.sourceforge.net/
- Select version for your computer (Mac or Windows)
- Follow instructions for downloading to your computer.
2. Learn your Audacity workspace
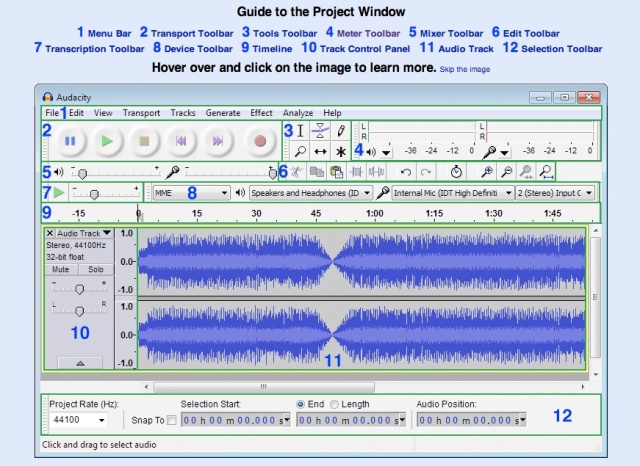
Click on this image to explore the Project Window on the Audacity Online Manual. It allows you to hover over parts of the project window and learn more about each.
3. Import audio files
File > Import > Audio
Then click on the file you want to load into Audacity.
4. Play, Pause and Stop
- Press the Play button
 to start playback.
 - Press the Pause button
 once to pause playback, and again to resume.
 - To stop, press the Stop button
 .
.
NOTE: You must press Stop in order to edit. You can not edit if you press Pause.
5. Save Project
Save early and often. File > Save Project
6. Select sections of audio to edit
Choose the Selection tool. ![]()
Now click the left mouse button anywhere inside of an audio track, and click and drag to the other edge of your selection, and release.
You can also select using the keyboard and toolbar. Read more details about Selecting Audio
7. Split Delete
This allows you to select a section of sound you want to get rid of without shifting the following audio over.
Select the section using the Selection tool ![]()
Then Edit > Remove Audio or Labels > Split Delete
Read more about splitting a track into clips
8. Duplicate
This allows you to copy a section that you want to keep and create a duplicate of it on another track.
Highlight a section of audio using the Selector tool ![]()
Then Edit > Duplicate
9. Moving Clips
Highlight a section you want to move using the Selector tool ![]()
Then click on the Time Shift tool ![]()
Then click on the clip and drag it to the left or right. This is called time-shifting because you are changing the time at which that audio will be heard.
10. Split and Move
This allows you to split a clip so you can move one section independently.
Highlight a section you want to move using the Selector tool ![]()
Then Edit > Clip Boundaries > Split
Then click on the Time Shift tool ![]()
Then click on the clip and drag it to the left or right.
11. Zoom in and out
Select the Zoom tool ![]()
You have several options:
- Left-click zooms in one step
- Shift-click or right-click zooms out one step
- Middle button zooms in or out to Audacity’s default zoom level of about one inch per second
Read more about zooming
12. Adjust volume of clip or fade in/out
Select the Envelope tool ![]()
A thick blue border will appear at the top and bottom of the waveform.
Put cursor on the blue border at the top. Click and hold it and drag the blue line down to lower the volume. Drag it up to raise the volume. The smaller the waveform, the quieter it will sound.

To fade volume in and out, you can create multiple points on the blue border by clicking on it. Then move just a section up and down.
Read more about the envelope tool
13. Mix multiple tracks into one single track
You can physically mix multiple selected tracks using the Tracks > Mix and Render. The original tracks are replaced by a single Audacity track that combines the audio from the original tracks.
Read more about joining tracks
14. Noise removal
You can get rid of an unwanted noise in the background (like a hum or buzz.)
Click on the Selection Tool ![]()
Highlight a section of your audio that only contains has that unwanted noise. It can only be a few seconds long.
Effect > Noise Removal
Click on Get Noise Profile button
Then select all of the audio track from which you want to remove noise.
Effect > Noise Removal > OK
Read more about noise removal
15. Export as .mp3
File > Export
Save As: Give your file a name
Where: Desktop
Format: MP3 Files
Save
It will create a .mp3 file
18. Backup your work
In Audacity, File > Save
Save your original Audacity file (.aup) on an external drive for safe keeping.
